11/09/2009

Sharper Image By Stop Down Aperture


Another trick the professional use is,... 

When possible, shoot at your lens' sharpest aperture.
For most lenses, that is about two full stops smaller than wide open (so the f-stop number you use will go higher by two stops).

For example, if you had an f/2.8 lens, the sharpest apertures for that lens would be f/5.6 and f/8 (two full stops down from 2.8).

Of course, you can't always choose these apertures, but if you're in a situation where you can (and we'll talk about this later in the book), then shooting two stops down from wide open will usually give you the sharpest image your lens can deliver.

Now, that being said, this isn't true for all lenses, and if that's not the case with your lens, you'll find your lens' sweet spot (its sharpest aperture) in short order if you keep an eye out for which aperture your sharpest images seem to come from.


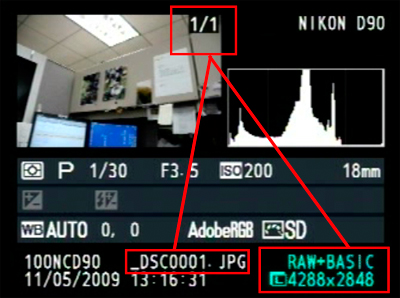
You can do that by looking at your photos' EXIF data (the background information on your shots embedded by your digital camera into the photos themselves) in Photoshop by going under Photoshop's File menu and choosing File Info.

Then click on Camera Data 1. It will show the aperture your shot was taken at. If you find most of your sharpest shots are taken with a particular aperture, then you've found your sweet spot.

However, don't let this override the most important reason you choose a particular aperture, and that is to give you the depth of field you need for a particular shot. But it's just nice to know which f-stop to choose when your main concern is sharpness, not controlling depth of field.

Continue Reading...

11/06/2009

How To Check CF Card Slot Pins Bent!


Compact Flash ( CF ) memory cards use 50 tiny pin holes to interface with a digital camera. 


As you insert the memory card into the camera, it slides down a track holding it in place to line up with the pins in the cameras card slot.


 The top image shows a memory card with pinholes in good condition. Safe to use.
The bottom image shows several pinholes that are damaged due to bent pins. Replace this memory card, and inspect your cameras card slot for bent pins. Service if necessary. Do not attempt to bend the pins back yourself, let a service technician do it. The pins may snap off when bending them back into place.


Memory cards are small and fit easily in your pocket when not in use. Unfortunately, people also keep keys, change, or other objects in the same pocket that could potentially damage or clog the holes of a memory card..
Sand ( particularly beach sand ) fits perfectly in these holes and could easily bend a pin in a camera causing a CHA (card access) error. Damaged pins may be straightened if you are lucky, if not they could bend enough to touch an adjacent pin causing a short, or even push through the printed circuit board and detach entirely. Either way, it may be a costly repair, as this type of damage is not covered under warranty. An easy way to prevent this from happening is to use the card case or cover that ships with (most) memory cards, or buy a card case to store all memory cards when not in use. It is also a good idea to inspect the card for any debris before inserting into the camera.


Continue Reading...

Why I Got 1 Image Take a NEF + JPEG ?


Most Nikon Digital SLR cameras have the option to capture NEF + JPEG images. The JPEG image may be used for anything from web publishing to a quick print with minimal editing, while the NEF RAW file is saved for more extensive processing later on.
Lets say you choose the NEF + JPEG option in your camera and take a single picture. The NEF RAW image is recorded to the memory card and the JPEG processing is performed in camera for quick display.
The D90 camera display below shows 1/1 indicating it the ' first of one image(s) '. The lower right hand corner displays the capture method, RAW + BASIC, then the image size of the JPEG file, L 4288x2848, and to the left is the JPEG filename _DSC001.JPG. Only one file is needed for display since they are the same file.


When the image is ready to be transferred to the computer using Nikon Transfer software, only one image is displayed again, this time it is labeled as the NEF image, with an icon of two files overlapping to indicate instructions for Multiple Files were recorded, NEF RAW + JPEG.
After image transfer, if the default image viewer is Nikon View NX, the Multiple File symbol is shown again, and the NEF and JPEG file names are identified in the Metadata.


It is not necessary to display both images at any time using Nikon software, since the editing choices depend on the application performing them. You can edit the in-camera processing perfomed on a NEF RAW file using the Quick Adjustments and Picture Control Utility in View NX, or for complete control of NEF RAW editing possibilities, Capture NX 2 is the best option.


Continue Reading...

Learn To Avoid Red Eye Photo


Why people often get "RED EYE" when using a flash... ?

Let's just look at how to avoid it.

The main reason is your camera's pop-up flash, which sits right above your lens and is an almost automatic recipe for red eye.

The easy fix (the one the pros use anyway) is to either get that flash (ideally) off the camera and hold it a couple of feet away from the lens, or at the very least up much higher away from the lens, to reduce the chance for red eye.


Another method is to bounce your flash off the ceiling, which is a great cure for red eye.

Of course, all of these require you to have a separate external flash unit (and not just your camera's built-in pop-up flash).

If you can't spring for an external flash, there are a few other popular strategies when you have no choice but to use your built-in pop-up flash:

(1) turn on some room lights, if possible.
It lets your subject's pupils contract, and that causes less red eye than shooting in complete darkness.

(2) If your camera has a red-eye reduction mode (where it sends a preemptive flash, which causes your subject's pupils to quickly contract, before it fires the main flash), that sometimes reduces red eye.

(3) Ask your subject to look slightly away from the lens and that will certainly help, plus

(4) moving your camera closer to your subject can also help reduce the dreaded red eye.


Continue Reading...

11/01/2009

Nikon D90 Accessories

Here summary of the Nikon D90 accessories.


1) Battery EN-EL3e


2) Wireless Remote ML-L3


3) LCD Protection


4) Wireless Flass SB-600


5) GP-1 GPS


Continue Reading...
 

About Me

We Share Nikon D90 Tricks & Tips & Knowledge. Learn Taking Photo To The Next Level Like Professional. Get Update New Nikon Products Service All Around The World. View Great D90 Picture From Pro & Share Your Experience To The CLUB
"Aston inspired me about Nikon D90 when I saw him on the TV. Since then I start to learn about Nikon & Photography".

Nikon D90 CLUB